


One would assume that when undertaking a stereoscopic 3D project, the team will be conceptualising their ideas in 3D. And yet, the reason for the notoriety associated with Stereoscopic 3D or S3D today is because most people who are making 3D are not really visualising it in 3D. But the few good 3D projects out […]
 One would assume that when undertaking a stereoscopic 3D project, the team will be conceptualising their ideas in 3D.
And yet, the reason for the notoriety associated with Stereoscopic 3D or S3D today is because most people who are making 3D are not really visualising it in 3D. But the few good 3D projects out there today are ensuring that this technology is here to stay.
To illustrate how 2D thinking is written all over some current S3D productions, take a look at some of the 3D movies today, especially the framing of scenes. Notice how there is no “head room” on narrative shots of actors. Close, tight framing, chopping of the actors face at the forehead is a sign of 2D thinking in a 3D movie.
This is not to say that you cannot frame that way in S3D. You can, but you have to make sure that the actor is then framed well within the “stereo window”. This is one of the reasons why S3D needs its own thinking and a new language and grammar.How do we begin thinking in 3D, and getting down to producing S3D content practically?
Introducing the Stereographer and the Depth Script:
The stereographer is a new addition to the production crew as is the so called, Depth Script. Just as every TV production or movie can either have a DP, camera operator and director rolled into one, so can an S3D movie. The importance of having separate crew members in any production, however, is so that each person is responsible for their area of expertise and more importantly can concentrate on that part of the production while working in tandem with other crew to realise a smooth workflow. This applies equally to 2D movie making as it does to an S3D production.
The Depth Script, in a nutshell, is the relative depth feel or Depth budget of a typical 90 minute movie or a shorter duration TV piece that is plotted as a graph from left to right for either an individual actor in a movie or the entire production as a whole.
This graph gives a visual representation in time of how much out-of-screen effect, on screen (rest time) and behind the screen, the 3D depth is.
Why is this important? Besides the creative side (depth can be used to portray moods of happy and sad scenes for instance) the main reason is so that audiences do not strain their eyes and brains with too strong depth for too long, or worse too shallow depth which gives rise to what we call “flatties”; boring S3D movies that may as well have been 2D movies.
The job of outlining and implementing the Depth Script is one of the reasons the stereographer is important right from the scene blocking stage, to being present on-location and later with the editor in post-production. The stereographer ensures that the intent of the depth budget is followed as best as possible both creatively and practically for a well rounded and entertaining S3D viewing experience.
The stereographer works with the DP, and the Director to ensure that the depth script is implemented as intended. In really good S3D productions the stereographer may even work on sessions with the Director and scriptwriter to get creative with what the third dimension or spatial info can do for a 3D movie.
Every stereographer should, therefore,
Be part of a film (movie) crew, ideally at the script and screen play revision phase for the best 3D experience.
Creating a depth script for “3D mood” treatment of the movie.
For modern digital movie projection, also co-coordinating with set and costume designers to creatively suggest minimising of high contrast colours that may cause stereo cross-talk.
On-location co-ordination with DoP to assist in Stereo framing and implementation of the Depth Script.
Suggest cutaways, Cat-in-the-window shots and other time permitting takes to assist the editor with options (footage) to maintain proper depth cuts, during post production.
Being present at all post production sessions to tweak stereo for viewing.
PRE-VISUALISE IN 3d
:
Every good 2D movie or episode for a TV serial has location scouting and pre-visualisation as a requisite for a smooth day-of-shoot event.
For an S3D production, there is the same need, and in fact, much of the tediousness associated with an S3D project can be removed simply by doing practical recon and pre-visualisation in stereo 3D.
Just a year ago, we had to build our own S3D camera rig if we wanted to capture location shots and video clips in 3D. Today, there are a variety of consumer grade 3D cameras from the likes of Fuji and Panasonic that are already two-lens cameras or have adapters for 3D that fit over a standard camcorder. Although these have what are called fixed interaxial (the distance between the lenses of a camera), there is a cost effective way to build your own variable interaxial 3D rig. [See box].
By taking notes and a few measurements of a location, and importing them into Previz software such as FrameForge 3D studio, it is possible today to build highly accurate simulations of real world sets and “direct” and shoot or block camera moves in this software that removes much of the guess work of what to do when actually on location, thus saving time and money.
Such software apps come with lens and camera characteristics built in for typical digital cameras. Combined with capturing location shots in S3D, a working depth script and shot blocking storyboard can be built that proves invaluable on the final shoot.
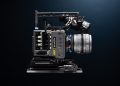
The 3D Camera Side by Side and Beam Splitter 3D Rig:
Normally, we want the interaxial to be around the same as our interocular (the distance between our eyeballs). Interaxial is usually used when referring to cameras, and interocular for eyes, but these terms are swapped around in normal conversation now on 3D movie sets.
There are times, however, when we need the interaxial separation to be much smaller than the human eye-width of approx 6.5cm, and this is needed when shooting close ups in drama or narrative scenes, for for doing macro 3D shots.
This is when there is the need for the intimidating looking “beam-splitter” 3D rig. That device is what makes 3D cameras look scary. The reason for using the beam-splitter or mirror-box rig as they are called is because todays cinematographers are used to their preferred digital cameras when shooting. A pair of cameras such as the Arri Alexa or RED ONE or even mid-budget sized cameras such as the Sony EX3s when placed side by side, have an interaxial distance much wider than our human interocular and thus a two way mirror is needed.
This two-way mirror is mounted on a frame in a precisely 45 degree angle. One camera is then aimed through the mirror and records the scene, and the other camera is mounted either vertically at 90 degrees aimed down at the mirror coated side of the two way mirror and thus records the same scene reflected in the glass.
The second camera can also be mounded under the first camera and aimed upward if the reflective side of the mirror is angled down at 45 degrees.
By horizontally shifting either or both of the cameras (sometimes mounted on motorized sleds) it is possible to change the effective interaxial of the 3D rig from 0 to approx 4 inches depending on the width of the mirror and the box size.
So the concept is simple enough, but there are considerations to look into, such as dust particles, mirror and camera alignment, loss of light due to mirror, and un-equal polarisation of reflected light. All of these can be corrected for with todays solid construction of 3d rigs, or later in software, but the simplest way to shoot 3D is to “Think in 3D”.
This would mean, getting over previous mental blocks of camera equipment, and using the right tool for the right job. Just as today we would shift to a Mac for creative video work and a PC for other kinds of jobs even though both platforms can perform both tasks, we should learn to adapt to the tools that work best for production of S3D content. Previously, it used to be a question of the “dynamic range” and Latitude or sensor size that mattered in deciding the right equipment, but today technology is changing rapidly and prices are plummeting thereby blurring the line between un-affordable “pro” gear and consumer grade equipment.
Just two years ago, a cinematographer would be laughed at if he announced that he was going to shoot a feature film on a DSLR camera, yet today there are a slew of films recorded on that very same platform that have sensor and light sensitivity that out performs Pro digital cameras costing many thousands more.
Does this mean we can shoot the next S3D project on lightweight and inexpensive video DSLR cameras? Not as of today, but read Genlocked Cameras and S3D in the boxes. In essence, with the use of creative and proper lighting, and cameras such as the Si2K mini, the Panasonic dual lens 3D camera, and the use of high bit rate or uncompressed portable recording devices such as NanoFlash 3D, Cinedeck or even high powered laptops, its possible to mix and match hardware and software to give Cinematographers anything from hand held and shoulder braced 3D rigs that can also be flown on Steadicam to mounted within the confines of the cockpit of a race-car.
If movies such as Slum Dog Millionaire could mix footage shot with an Si2K mini with film-stock and be colour graded so that no one could tell the difference, we believe that an innovative and practical approach to shooting everything from the next feature production to a TV serial in S3D can be done with gear that does not break the bank and is readily available today.
More importantly, it takes away the stigma associated with shooting 3D movies with cumbersome and unwieldy 3D camera rigs.
On-location Preview, Dailies
and Post:
When shooting in S3D, it is only natural that we monitor it in S3D. However, here we hit on a stumbling block that is unique to producing stereoscopic content. In 3D, bigger is better, and we can never know what the final 3D will look like on a cinema screen if we preview only on a 24″ or 42″ monitor. These are some of the caveats of shooting 3D, but there are workarounds.
Experienced stereographers may not even look at a preview image in 3D when on location. To them, simply watching the red-cyan “fringes” on a preview monitor is sufficient to know what the final depth will look like.
However, these kinds of stereographers are few and much sought after. It wont be long before the first breed of new stereographers reaches this stage, but in the meantime, there is no set standard for monitoring 3D on location. Some stereographers do not like to use red-cyan (anaglyph) to monitor 3D; they prefer full colour polarised or shutter glasses.
In truth, anaglyph makes for a perfect Depth grading system. The key here is to realise that anaglyph 3D can be used for depth grading only, not as a final delivery medium. Usually directors, and visiting VIPs may at times sit some distance away from the actual set, in the video village and use shutter or polarised glasses to preview full colour 3D.
Of course, this wont come close to representing the true immersive feeling of the 3D scene on a 42″ monitor. This is where sometimes using the inside of a portable tent, or film crew truck can show a larger image if a portable 3D projector is available. At the very least, even regular projectors can project a large image in anaglyph and give a feeling of depth scale.
3D monitoring solutions from Transvideo, BlackMagic Design and even the portable recording and preview systems such as CineDeck and NanoFlash 3D are proving to be very popular and lightweight enough to actually mount on the camera rigs.
The rushes/dailies/takes can be depth graded and assembled on a time line within a few minutes for the director to judge the flow of the movie right on-set in full S3D.
Again, huge paradigm shifts can be seen in the world of post processing. The demarcations between off-line and on-line editing have blurred due to the fact that Stereo3D footage is best graded and cut in a completely online environment.
One of the reasons is that an offline EDL (edit decision list) just might not work when viewed in S3D, because of huge depth jumps between outgoing shots and incoming shots, even if an experienced stereographer and editor try various tricks such as depth blending the two shots (changing the depth position of a shot by using HIT on the outgoing and incoming shot over the duration of the cut)
Software platforms such as the Adobe CS5 production suite can today handle 4K footage in stereo in real-time on consumer grade graphics cards from Nvidia, leveraging the power of these new age graphics processing engines to do what previously mini supercomputers did.
This has started a mad scramble with established and well known NLE (non linear editing) system manufacturers having to play catch up, as their systems are viewed as outdated and costs remain high to upgrade to a stereo 3D capable pipeline. The takeaway from this guide should be, that although to list exact equipment, products and workflows for producing compelling Stereoscopic 3D content could fill an entire book, the one thought that is worth keeping in mind is that in order to produce practical S3D content we need to leave a 2D mindset behind and start to move forward by “thinking in 3D”.
Clyde DeSouza is a Dubai-based stereographer and technology advisor at Real Vision FZ LLC, a Creative Technology firm that uses Stereoscopic 3D and augmented reality in Visual Communications.